Saturday, January 31, 2015

DIY Shabby Chic Jewelry Display


You don’t mind a post every year or so, right? Well, I finally decided to do a project I’ve been “sitting on” for quite some time now- a DIY Jewelry Display. I had seen varying themes on this idea on Pinterest, and since I just love all things girly, I decided to go with lace. 

I picked up an old frame and some lace from the Goodwill Outlet (I think the lace used to be curtains) and started by stapling the lace to the back of the frame with a staple gun. I was a little bit concerned that the weight of the lace might cause the lace to sag in between the staples, so when I was done I put a layer of hot glue around the edges as well, just for some extra support.

Now I have a great place to keep my earrings organized- that should save me about 10 minutes every Sunday morning trying to find a match! 

I just love it when a project is pretty and functional at the same time... ;-)

So, what have you been working on lately?

Sunday, December 1, 2013

DIY Felt Town Car Play Set


I’m back for a special pre-Christmas post! Last year I wanted to make something special for a little guy in my life. This guy was 3 years old and loved to play with his cars more than anything. I decided to look online to see what I could find in the way of roll-up felt play sets for cars. I found several cute ideas, but this little guy is super creative and imaginative, so I knew I wanted something that would help him expand his creativity.


For this mat, I simply got a large piece of green felt and edged it with some binding (is that what it’s called? I don’t know).

Incidentally, I do not sew. I did make a little bit of an exception for this project, however, just because I wanted it to have a more polished, finished look.

Anyway, I did my mat and then I started having some fun with my scissors and began cutting out all the pieces to go with it.


I did not attach any of these to the mat, and I left the roofs and signs separate from the buildings (except for one). That way the little guy could mix and match and make his town however he wanted it to be. These are the pieces I made:

- 7 buildings- just used felt, black Sharpie, and fabric paint for these

- 7 roofs- detailed with black Sharpie

- 10 signs- black Sharpie on white felt

- several road pieces, including some intersections, long straight pieces, short straight pieces, curved pieces, 3 parking lots, and a bridge- the lines were all created using white puff fabric paint (and a ruler).

- several bushes & trees

- a garden- made from brown felt with green “veggies” sewn on with a simple ‘x’ in the center of each.

- a pond and some river pieces made from blue felt


Then I made a little carrying sleeve for all the parts, including a “parking garage” for the little guy’s cars. The top folds down over the openings so nothing falls out.


I made the set so that it was its own carrying case- you just lay the “accessories sleeve” across the open mat...


...fold the mat into thirds over top of it...


....fold each end into the center so they meet...


...then fold it in half again (so the crease is on the place where the two ends meet in the middle...


...and fasten with the attached tab (also handle) and wooden button. Now it’s its own little case that’s about the size of a laptop computer. 


When I was setting this up to take the photos I had so much fun building my little town. I decided that the library should be a tall, happy-looking building, the hospital a nice gray two-story, the museum was a tiny brown building with a red door...I put the garden behind the barn and the lake behind that, with a little stone cottage by the creek. The felt makes it so everything sticks and the cars can drive smoothly on the roads. Honestly, I probably had more fun than I should have. 

Ahem.

Anyway, this is a project that certainly takes some time and effort, but it is fun to make and even more fun to play with! You can also include some extra felt scraps in with your gift to allow the recipient to create his own unique touches for his town.

Things are busy around here with 4 kiddos, but I’ll try to get back and post every now and then! Have a beautiful and thrifty Christmas, friends!

Click here for more great DIY Christmas gift ideas!

Thursday, May 30, 2013

Home-based Preschool: Ocean Explorers!

It’s the end of the year and we’ve run out of letters in the alphabet, so we decided that for our home-based preschool we’d just pick whatever themes we wanted to do and just have some fun! My friend Roseanne and I decided on doing an ocean theme- that means lots of fish, sand, and water play!

We started with our usual welcome song, opening prayer, and Pledge of Allegiance. Then to introduce our theme we did a little fishing game, which I forgot to take photos of- I had created a puzzle with a picture of a fish and the word, “FISH” on it. I attached a paper clip to each piece and used a dowel rod with a string and magnet to let the kids “fish” for the puzzle pieces. We put our puzzle together to spell out the word.

Next, we did the Five Little Fishes finger play:

Five little fishes, swimming in a school.      (Hold up 5 fingers, swim with hands)
The first one said, "This water's cool".        (Hold up 1 finger, then shiver)
The second one said, "There's a shark over there!"        (Hold up two fingers,then point)
The third one said, "We'd better beware!"        (Hold up three fingers, look scared)
The fourth one said, "Where can we hide?"       (Hold up four fingers, hold out hands)
The fifth one said, "There's a cave! Go inside!"      (Hold up five fingers, then point.)
Then in went the fish, and the shark went away,
And the five little fishes swam out to play.


Then we moved on to our fishing snack! 


We used pretzel rods dipped in peanut butter to “catch” goldfish crackers.


Little Boo got one! 


Tasty!


 After snack, we worked on our craft- jellyfish! Just a styrofoam bowl with streamers and googly eyes. Isn’t he cute?

Then we let the kids have some free play time while Roseanne and I arranged some Montessori-inspired learning centers. Once they were ready, we gathered them together and told them they were going to be Ocean Explorers. We took them on a tour of all the centers and then let them play. Here they are:


At this area, W is using a small strainer to scoop ocean items out of a tub of water (I think he has a sunken treasure box there). Once they scooped them out, they put them into a bowl. 


We also had a mini sponge (we cut one into smaller pieces) for them to use to clean up their drips when they were finished. They really liked that part.


Here’s A having some fun digging in the sand, which is really “cloud dough”- flour mixed with baby oil. This stuff is REALLY fun, but really messy!


Little Boo and her friend T had it all over their laps when they were through! We had sea shells hidden in there, plus a mini shovel and mini bucket/sand castle mold and a few other goodies.


Little Boo enjoyed this activity- we have a small dish with blue play doh in it. The kids had to press the play doh down into the container, then stick the golf tees in the play doh. Then they had to balance the marbles on top of the tees. 


They did a great job!


Here is C doing some “sea urchin” tonging- he’s using a strawberry huller to move the spiky rubber balls from the dish into the places in the paint palette. Tricky stuff, but the kids did great!


Next was our magic wand activity- we had Mr. Octopus and his eight legs, with eight bubbles around him. The kids had to use small disks (each is made of transparent colored plastic with a metal rim around it) and place the disks on the bubbles.


Then they used the “magic wand”- a magnet- to pick up all the “bubbles." 


Next was our fishing hole. We had a blue blanket which was our ocean, then several fish (just shapes cut from foam) with paper clips attached. Here T is using the fishing rod to catch some.


We had a small basket for them to put all their collected fish in. 


 Here is W working on rolling up a beach towel at another center. Good work, W!


 Out last center was some blue play doh with some ocean-themed cutters and molds, plus the letters to spell out “fish.” I did this one myself, in case you couldn’t tell. ;-)

For our next activity we decided to be scientists and do an experiment. I had a bucket of objects and each child took a turn to pull one out and make our hypothesis about whether it would float or sink.


We talked about why certain things would float and others would sink depending on their shape and what they were made of. 


We had two towels, each with a sign to identify if the objects floated or sunk. 


And then we all splashed in the water just for fun.


While I cleaned up our experiment and started preparing lunch, Roseanne read some great ocean-themed books to the kids. 


For lunch we had octopus hot dogs and apple boats with cheese sails.


 And some blue jello ocean with swedish fish swimming in it and a vanilla pudding beach with graham cracker sand. (If you’re going to do the jello with the fish, I recommend doing it the morning of your event. I did mine the night before and my fish ended up being a little bloated and squishy. Ick.)

And that was our ocean-themed preschool! So much fun!


Thursday, March 21, 2013

Home-based Preschool: X is for X Marks the Spot and X Ray!

Seems like these are the only posts I have time to do these days. Well, other than that Shabby Apple giveaway. Did you know that if you enter, like a dozen of those giveaways you have a pretty good chance of winning one? LOL! But that’s for another post...ahem. Anyway.

X Marks the Spot

So this week I had the good fortune of having my turn for our home-based preschool land on the letter X! (We do one letter a week.) Because it was the day after St. Patrick’s day, I thought it would be fun to do a treasure hunting, x-marks-the-spot theme.

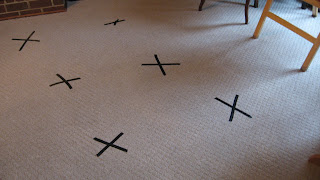
The kids got a hint of our letter for the week as soon as they came into the living room, where I had used black electrical tape to make x’s on the floor for each child to sit on during our circle time. This set-up actually worked out really well- they weren’t all over each other like they usually are on the blanket and they weren’t playing with them like they were when I used foam squares.


Then we sang the alphabet song, but when we got to x we clapped instead of singing it. Then I told the kids that today we were going to have Leprechaun Training School. Leprechauns use a letter x to mark the spot where they keep their treasure, so we have to know how to find the letter x. I had the kids do an x hunt on the white board:


Each child had a few turns to come up and x out a letter that wasn’t an x, and then each child got to circle an x.

Next was snack time! We had Lucky Charms which we sorted, and we also looked for the x’s in them.


And we ate plenty of them as well, of course. :-)


After our snack we played for a little bit, then came back for our craft. Leprechauns need a lucky shamrock, so we made some with paper, glue and felt.


 I made these papers that read, “X Marks The Spot!” and cut some hearts out of felt, which became the leaves for our lucky shamrock.


I gave each child a small cup with about a tablespoon of white glue in it and a paintbrush. They “painted” their heart leaves with the glue and then put them in the right place, then added the stem. They did a great job!


After some more play time we came back to our x’s on the floor and read some stories and did a “5 Little Shamrocks” rhyme using the felt board and counting on our fingers.

After that, it was time for a treasure hunt!! I told the kids that a tricky leprechaun had left us a fun treasure hunt and told me where the clues were, and that I was going to give them hints but they had to do it themselves (after all, they were in training to become leprechauns).


Here’s how it worked: I created a treasure map that showed the route to the treasure. (Dora style!) We started in the kitchen.  I told the kids that in order for us to get to the treasure, we had to find the clue that would tell us how to get to the next room (the purple slips of paper with a question mark on one side and instruction on the other). In the kitchen I had a paper that had pictures of different parts of the kitchen: the table, the fridge, a cabinet, etc. (the photo above shows the one I did for the playroom). When we entered the room, I got out the paper and a marker. I gave the marker to one child and said, “The leprechaun told me he did NOT hide the clue near the table.” The children would take turns drawing an x through each place the clue wasn’t, and we would look for the clue in the last spot left.

The clues said things like, “Crab Walk”, “Hop!”, and “Crawl”. We would do whatever it said to get to the next room, which was kind of funny. :-) We finally found the treasure in the cabinet in the bathroom- gold covered Rolos!


Ha ha, they were excited.


The kids had some more free play time while I got our lunch ready. We only had 4 kids that day, so I made a single green cheese quesadilla (used some of those green tortillas that Mission makes) and made an X in it to cut it into 4 pieces. I also gave the kids apple slices, and I told them that if they had passed their leprechaun training, then when I sprinkled some special leprechaun dust (lime jello powder) on their apple slice while they were holding it, it would magically turn green!


Little Boo was so excited that she passed!


I also served veggie straws and pretzel sticks so the kids could use them to make an x. This Hello Kitty cutie did a great job with her x’s!


And how about this adorable little leprechaun?


 Too cute!

X is for X Ray

On Wednesday we did X is for X Ray! We started with circle time and I showed the kids this cute video about the letter x. I let each child take a turn using a straw to point to the x’s on the screen. 

Then I introduced the X is for x ray theme by showing the kids some x rays we had from when my husband had been in a car accident many years ago. We talked about how we all have bones in our bodies and we felt some of our bones. Then we ATE some bones for snack!


Aren’t you loving Little Boo’s hair? LOL!


I made these bones using pretzel sticks and mini marshmallows. Just stick the marshmallows in each end and then dip them in white chocolate. Yum!


After snack, we did our x ray craft. I traced the kids hands using a white crayon on black paper. Then I gave them each a cup of glue and let them dip each end of Q-tips in it and stick them to their paper like bones.


After our craft, we had some play time, then we sat back down to read some books that helped us learn about some of our bones. We sang “Head, Shoulders, Knees and Toes” and then we watched and danced along to the Skeleton Dance.

After our dancing, we had some X Ray Tech Training by playing “Guess the X Ray.” I had gone online and found several x ray images which I showed to the kids and had them guess which body part it showed. I also threw in a couple fun ones like this one to make them laugh:


Once they had completed their X Ray Tech Training I put them to the test and we played Doctor. I had one child pretend to be the patient (who complained of some kind of pain), and the other was the doctor. They did a brief checkup (listen to the heart, check the reflexes, etc.), and then the patient was told they needed an x-ray. They then entered our x ray machine (they went under the easel) and the doctor pushed some pretend buttons and made button noises (beep, boop, beep beep).


And out popped an x ray that looked something like this! You can barely see it, but I made it look like one of the bones had a break in it with a tiny letter x where the break was. The doctor had to look carefully at the x rays to find where the x was and circle it. Each child got their own x ray.


Now THAT is one cutie patootie doctor.


After all our doctoring, we talked about how important it is to keep our muscles and bones healthy so we don’t break them, and then we did some eXercising! I found this fun exercise video for kids. They loved it!


I think everyone was being elephants...

After that I sent everyone to go play outside while I prepared an eXcellent lunch:


And that was our eXtraordinary week!
Related Posts Plugin for WordPress, Blogger...